Image Map
Showing posts with label do it yourself. Show all posts

Sunday, October 6, 2013

Revamping a TV Tray

Before the move I revamped an old TV tray my parent's had in their closet so I could use it as a side table on the other side of my bed.  Really easy and cheap project so stay tuned!

Started like this
Sanded the whole thing down, unfortunately mine was pretty old and pretty cheap. It had quite a few water marks on the top which made painting a little more difficult. 
I gave the whole tray several coats of while spray paint.
I then taped off the top where I wanted the stripes and painted them.
Then all you've got to do is let dry and remove the tape.  You may have to touch it up a little after the tape is removed.  When I took the painter's tape off it removed a bit of paint.


Wah-La! Cute side table.
To see how I made the magnet board in the back you can go here.

Tuesday, September 24, 2013

Becoming a Woman: The Story of a Headboard

Well guys, it happened, I am officially a woman; I have a headboard!  A few months back I shared a post about my longing for a headboard, you can find it here.  I knew I wanted a rustic style, DIY headboard but I had a couple different ideas.  I finally settled on this being my inspiration...

I didn't have a pallet big enough for my bed so I simply sent this picture to my craftsman (my father) and he built it for me. I would have loved to do the staining myself but I wasn't able to make time in my schedule to drive up to Riverside and do it.  But, the important thing is that I have a head board, see...
Reed the deer loves it.

Monday, September 23, 2013

Chevron Fail

This summer when I was spending time at my parent's house before the move I decided to to a couple of DIY projects for the new house.  One of them was revamping a cork board.  I had seen a few things I liked on Pinterest and thought it might be fun to do a chevron pattern on the cork part and paint the frame.  Okay, let me just tell you, I know that chevron is all the rage but I had never actually attempted to draw it out and for some reason I found it a lot harder then it probably should have been.  First off, let me just say I failed geometry in high school, angles are not my thing.  Secondly, Rose Art cork boards are cheap for a reason, the cork on the top layer comes off very easily when pulling off painters tape.  Anyhow, everyone has their DIY fails so I thought I would share mine.

Starting out
Tapping out the chevron
Clearly helping
Painting the cork
Crooked chevron pattern with some missing paint and cork.

It's really not all that bad.  The righthand side is obviously where it is most noticeable but I figured it's a cork board, things will be pinned to it and it'll be covered up half the time.  Plus isn't perfection overrated anyway?

But honestly, if anyone has any chevron pattern tips that may make my life easier in the future that would be awesome.

Sunday, July 7, 2013

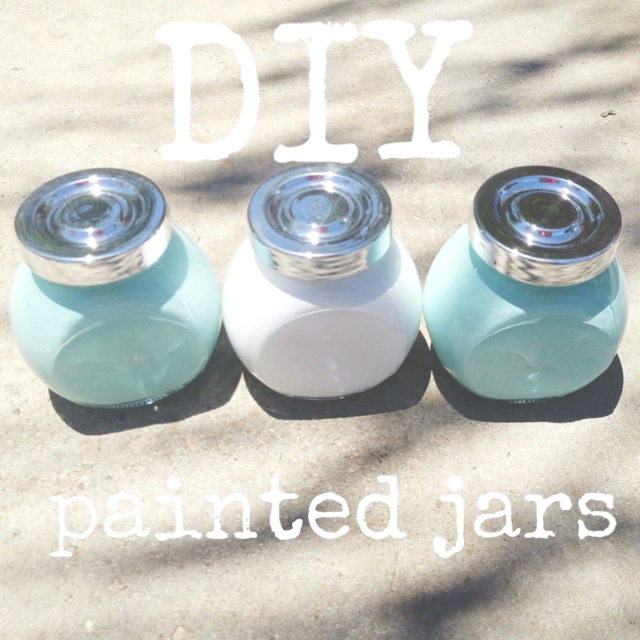
DIY Painted Jars


I hope everyone had a lovely 4th of July weekend, I'll post about mine soon but first, crafting!  Last weekend while at my parent's house I got this urge to craft.  I really haven't in a while but since I am moving again in a month I have been having this overwhelming urge again to craft and make things for the new house.  My mom decided to feed my jar fetish and bought me a three pack of small jars at the dollar store.  Of course I already have every size and shape of jar out there, but, despite seeing countless tutorials on Pinterest and other blogs I have not yet tried out the whole painted jar thing.  Since these were only a dollar I decided to give it a go.


The first thing that I learned about painting the inside of a jar is try not to look at the inside while doing it, the outside is what you are going to see so concentrate on how it looks from that angle.


The second thing I learned is to be very liberal with the amount of paint you put in that jar.  If you use little paint you are going to be able to notice, especially if you hold the jar up to the sun.  Because of this i decided to do several coats.

Besides those two things, there really are not rules.  I did mine by basically blotting the inside with a paint brush although I've seen a few people that put a drop inside the jar and swirl it around.  I cannot attest for that method but I can attest to the brush and blot method; mine turned out pretty cute I think...


I would definitely recommend running you your local dollar store and buying a couple of these babies to try it out.

Friday, August 24, 2012

DIY Fabric Magnet Board

So, I have been meaning to post this tutorial for a while but because I just moved this week, I just finally got to hang up my magnet board.  Now that it's completely finished and up I though I would share with you how I did it. So stay tuned to figure out how to make this...


What you'll need:
  • Metal board of any size (got mine at Home Depot)
  • Spray Adhesive
  • 1 yard of fabric
  • Buttons
  • Extra strong magnets
1.  I laid the fabric face down on the floor and laid the metal board on top of it.  There was quite a bit of extra fabric surrounding the edges so I cut some off still leaving enough to fold over the board. I made sure I had enough fabric to folder over the board, act just like you are wrapping a gift, make sure to pull the corners tight.  

2.  Once I knew how I was going to wrap it I picked up the metal board and sprayed one side all over with the spray adhesive and put that face down onto the fabric again.  I let sit for about thirty minutes so the front could start to dry.

3.  Next I came back and started spraying the edges of the board and the fabric where I would be folding it over.  I folded the fabric for real this time, use extra adhesive spray where you think you need it.  Again be sure you all pulling the fabric tight especially around the corners.  I then let the board sit for a few hours while I moved on to the buttons

4.  Choosing buttons without backs makes this easier, however I couple of mine did have nubs on the back and I just sawed them off.  You can buy individual or bags of buttons at most craft stores.  Then, I used a hot glue gun to glue a magnet to the back of each button.  When letting these dry make sure to space them apart liberally so they do not stick to each other like magnets do.

5.  After everything is dry you are pretty much finished!  Hang it up and put pictures, reminders, art, anything you want on it!


Monday, July 9, 2012

Envelope Holder Revamp

I shared with you a few days ago that I bought an envelope holder at a local thrift store for $5 and I planned it revamp it so it wasn't such an ugly color.  To see the post about when I got the envelop holder look here.

Now, here is what it looked like before.

It was an ugly color; some areas were lighter then others for whatever reason.  The box is actually plastic although it looks like wood.  I had some white spray paint in the garage and decided to spray the box white.  Here is the box afterwards...


I think the white makes the design on the front stand out more too.

Tuesday, July 3, 2012

DIY Necklace Hanger

I am sure many of you have seen these idea all over Pinterest, I have seen dozens of bloggers do this and I thought the idea was brilliant.  The unfortunate part about this idea is that it involves power tools and me + power tools=disaster.  Luckily my dad helped me out A LOT with this because he is the wizard of woodwork.  So let's get started.


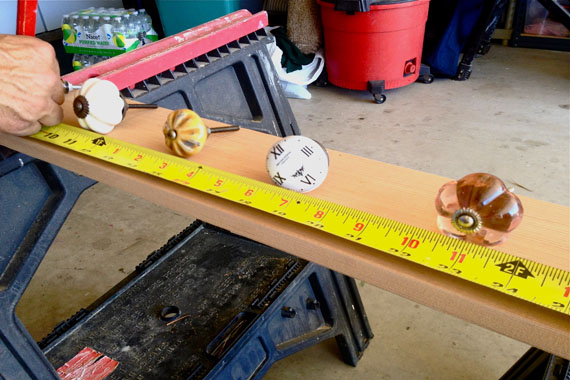
1. Buy some drawer knobs you like.  I got most of mine at Hobby Lobby except the key hole one I got from Michael's.  The knobs from Hobby Lobby were all 50% and the one from Michael's was only $1.50.  You will also need a piece of wood.  Luckily my dad has some scrap wood in the garage and I just used that.


2.  We measured the knobs about three inches apart from each other but it just depends exactly what you want to hang on them.  Since these will only be for necklaces they don't have to be that far apart.

3.  We cut the board down so it was smaller and drilled holes for the knobs.  


4.  After the board was cut and drilled I stained it with this Red Mahogany stain.  This is obviously optional, you may want to paint yours a color or leave the wood alone depending on what you piece of wood looks like.


5.  I screwed the  knobs into the desired holes and then my dad sawed off the ends of the knobs so I would be able to hang in on the wall.  If I had tried to saw this myself I would probably be typing this with four fingers, thank god for dad.


Let the stain dry a bit and you're done!  I've packed mine away now for my new house but I'll be sure and post pictures of it when it's hung up.

Thursday, June 14, 2012

DIY Distressed Jewelry Stand


Hello lovelies! I have another DIY project that I actually completed last week.  I have more jewelry and knick knacks then I know what to do with so I can never have enough storage.  I saw this idea on Pinterest for a distressed jewelry stand made out of terra cotta pots and I thought it would be perfect and pretty easy to do.  I followed the link on Pinterest and the blog showmecute.com had an amazing tutorial on how to make it!  Visit the tutorial here and watch her video tutorial to find out how to make one!
I obviously did mine in brown, but you could do any color you want and I used Gorilla Glue to glue mine together and I believe in the tutorial I linked she uses super glue.  I'm just going to give you a couple tips if you do decide to use Gorilla Glue like I did: 1. READ THE DIRECTIONS COMPLETELY! I did not, it clearly states on the bottle to wet the surface you are gluing and yeah that does help, directions are there for a reason! 2. A little goes a long way, Gorilla Glue does expand so don't use too much. 3.  Gorilla Glue takes a few hours to dry so make sure you give it enough time to dry completely and do not touch it while it is drying.


Hope you guys enjoyed! Let me know if you try it too!

Tuesday, June 12, 2012

Revamping a Target clock

I've been looking for all sorts of cheap knick knacks to revamp lately because I'm moving in August and as most of you know twenty something students don't exactly have all the money in the world to furnish a home.  My mom gave me this old clock she got at Target a few years ago, she had broken the glass around the face and wasn't using it any more so I decided to redo it and make it look old and vintage.

Unfortunately I did not get a picture of the clock before I redid it.  I asked me dad to help me talk it apart so I could paint it and before I could take a before picture I turned around and the clock was in pieces. Thanks dad I guess for helping me out so quickly.  To give you a visual, beforehand the clock was a boring silver color and had cracked glass around the face.  It looked similar to this clock without the bells on top.
Because the glass was broken I just took it out and threw it away.  I then took all the silver pieces that I wanted to paint and laid them out on a piece of cardboard then primed them with a spray primer to help the paint stick.


I let that dry for about fifteen or twenty minutes before applying white spray paint over the primer.  I didn't need to worry about doing it perfectly because I was just gonna scuff it up later!


I let the white paint dry for a few hours while I went in to watch the hockey game. (Yeah LA Kings Stanley Cup champs!) After it had dried I took a piece of sand paper and scuffed up the edges, feet and some of the back to give it an old shabby chic look. Then I put it all back together and wa la! A cheap clock from Target is now a vintage decoration!